Report Options
Select Report Options under Scenario in the tree view to change
options for reports and graphs.
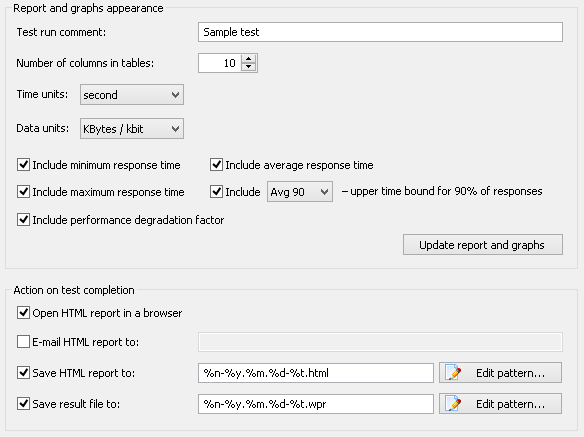
Report and graphs appearance
Test run comment: Here you can enter your comment for test run. This comment will be displayed in HTML Report and Summary Report.
Number of columns in tables: Here you can specify a number of columns that will be used in tables of HTML Report and Summary Report. The whole test duration interval is divided into this number of intervals. The program calculates the averaged data on each interval and shows it in reports.
Time units: Select a desired time unit (second, minute or hour)
that will be used in tests.
Depending on this option, the program will measure the number of pages/hits/sessions either per second, minute, or hour.
These values are represented in the Performance Data report.
Data units: Select a desired data unit (KBytes/kbit, MBytes/Mbit or GBytes/Gbit) for
the data represented in the Bandwidth Usage report:
KBytes sent/received, Sending/Receiving speed, Sending/Receiving per user speed.
The following options allow you to customize reports - you can define what time values will be included in reports.
Include minimum response time: This option defines whether the values of minimum response time
will be included in reports or not.
Include average response time: This option defines whether the values of average response time
will be included in reports or not.
Include maximum response time: This option defines whether the values of maximum response time
will be included in reports or not.
Include Avg80-99 - upper time bound for 80-99% of responses:
This option defines whether to include the upper time bound for 80%-99% of responses in reports or not.
(The upper time bound for 80%-99% of responses is calculated in such way that response time of 80%-99% of requests
is less than or equal to this value.
Average 80%-99% download/processing time is calculated in the same way.)
See the graphs for individual pages to analyze
values of Average 80%-99% response/download/processing time for each request.
Include performance degradation factor:
This option defines whether to include the performance degradation factor in reports or not.
Each request has the baseline response time. It is set during recording; then it can be re-calculated
after the test verification, or you can modify this value manually in the
request properties. Performance degradation factor
shows how much the performance degraded in comparison with the baseline response time.
Update report and graphs: Click this button if you need to update the current report and graphs using the
options specified in this section. If this button is disabled, it means that there are no results of test run yet.
Action on test completion
Open HTML report in a browser: Opens a web browser window with the generated HTML Report on test completion. This report enables viewing test run results just from a web browser currently installed on your computer.
E-mail HTML report to: This option allows sending the generated HTML Report to any interested person
on test completion. Check this option and enter desired addresses in the text box.
If you enter several addresses, separate them by a semicolon.
Note that you should configure the E-mail settings
first to use this option.
All errors occurred during the delivery of E-mails are saved to a special file
SmtpLog.txt. This file is kept together with other log files.
Save HTML report to: Check this option to save HTML report
on test completion. HTML report is
saved to a default location specified in General
settings (Save report files to edit-box).
Here you can also see the default pattern for the names of HTML reports.
Click the Edit pattern... button to modify this pattern.
You can specify a subfolder of the default folder for saving the reports.
Save result file to: Check this option to save
WAPT Pro result file on test completion. This file is
saved to a default location specified in General
settings (Save result files to edit-box).
Here you can also see the default pattern for the names of WAPT Pro result files.
Click the Edit pattern... button to modify this pattern.
You can specify a subfolder of the default folder where the result file will be saved to.
![]()