WAPT Pro Integration with Jenkins
Jenkins is a popular Continuous Integration System (CIS).
WAPT Pro has a special
plugin for testing in Jenkins. Using it you can monitor your load tests performed by WAPT Pro
from Jenkins. Results of such tests are combined with the other integration jobs in the Jenkins dashboard.
• Installing WAPT Pro plugin for Jenkins
• Creating a new WAPT Pro item
• Creating a remote job
• Making a build for WAPT Pro item
• Reading WAPT Pro reports in Jenkins
• Uninstalling WAPT Pro plugin for Jenkins
• Troubleshooting
Installing WAPT Pro plugin for Jenkins
Installation of WAPT Pro plugin for Jenkins is performed in the Jenkins interface.
- In the management screen of Jenkins, click Manage Jenkins, then select Manage Plugins.
- Select the Updates tab where all available updates are listed.
-
Find the WAPT Pro plugin, check it and click the
Download now and install after restart button.
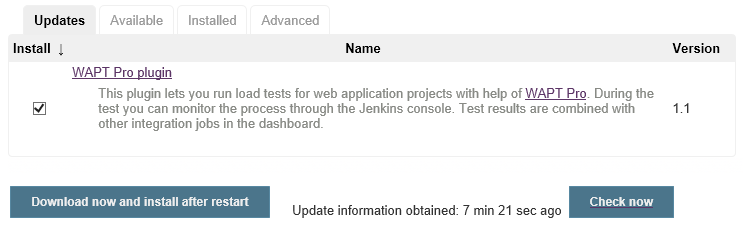
- Restart Jenkins.
Now you can run WAPT Pro load tests from Jenkins console.
There is another way to install the WAPT Pro plugin using the WAPT Pro
distribution kit.
- In the management screen of Jenkins, click Manage Jenkins, then select Manage Plugins.
-
Select the Advanced tab and find the Upload Plugin section.
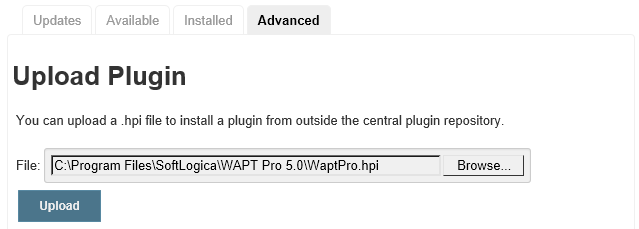
- Browse for the WaptPro.hpi file in the WAPT Pro installation folder. It is WAPT Pro plugin for Jenkins. Click the Upload button.
- Restart Jenkins.
Creating a new WAPT Pro item
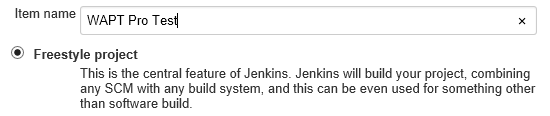
- In Jenkins homepage, click the New Item to create a new job.
Type a name for your new job and select the option Freestyle project. Then click "OK".
- In the Source Code Management section you can select the source code management system and
specify the location of WAPT Pro
scenario file and profiles. Jenkins will copy these files to its workspace, in this example - to
"C:\Program Files (x86)\Jenkins\workspace\WAPT Pro Test" folder.
If you do not use a source code management system, you should manually copy the scenario and profile files (.wps and .wpp) to the workspace folder, which is the Jenkins default folder for the project files.
If profile files are specified in your scenario with full paths, you do not need to copy them, but should make sure that those locations are accessible under the account used to run Jenkins. The same rule should be followed for the data files referenced in the profile functions.
-
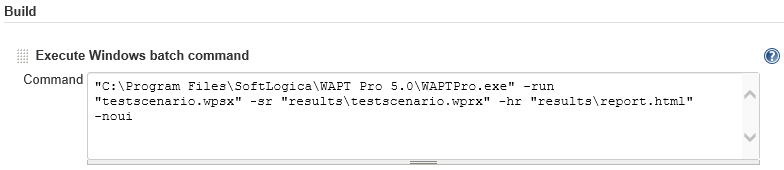
In the Build section, select the option Execute Windows batch command
and specify the necessary command arguments, for example:
"C:\Program Files\SoftLogica\WAPT Pro 5.0\WAPTPro.exe" -run "testscenario.wpsx" -sr "results\testscenario.wprx" -hr "results\report.html" -noui
Note that you should NOT specify the full path for the scenario file. Use only the file name instead ("testscenario.wps" in this example). Otherwise your Jenkins item will not work, because the output files will be created in the scenario folder instead of the workspace folder.
This command line:
• runs the scenario named "testscenario.wps" (-run),
• saves the results of test run as WAPT Pro result file "testscenario.wpr" in the "results" folder of the workspace (-sr),
• creates an HTML report file "report.html" in the "results" folder (-hr),
• does not load the GUI (-noui).
Here you can see the description of command line options.
-
Configure the Post-build Actions.
a. Select the first post-build action Archive the artifacts. This command archives the build artifacts so that they can be downloaded later. Archived files will be accessible from the Jenkins webpage.

Files to archive: Specify files to archive. You can use wildcards like it is shown in the example above. The base directory is the "workspace". You can only archive files that are located in your workspace.
In the current example this command archives all build artifacts located in the folder "C:\Program Files (x86)\Jenkins\jobs\WAPT Pro Test\workspace\results" and puts them to the folder "C:\Program Files (x86)\Jenkins\jobs\WAPT Pro Test\builds\number_of_build\archive\results".
b. Select the second post-build action Publish WAPT Pro reports.

WAPT Pro output files folder: It is a folder where the plugin searches for a report file. In the current example it is the folder "C:\Program Files (x86)\Jenkins\jobs\WAPT Pro Test\builds\number_of_build\archive\results".
WAPT Pro report file: It is the name of generated HTML report which is stored in the folder specified above.
Check test result: If you check this option, then the status of Jenkins build will depend on the result of test execution (success or failure) written in the "Test Result" field of HTML report. Otherwise, if this option is not checked, build status does not depend on the result of test execution. The build is considered successful, if WAPT Pro test run finished without errors (no matter whether the "Test Result" is success or failure).
After creating a new Jenkins item, you can start a build to get WAPT Pro reports in Jenkins.
Creating a remote job
Using Jenkins, you can connect remotely to WAPT Pro or WAPT Cloud
and run the load tests. Results of such tests are combined with the other integration jobs in the Jenkins dashboard.
When Jenkins and WAPT Pro (WAPT Cloud) are hosted on different machines, creating a job additionally requires
a slave node in Jenkins.
In this configuration, Jenkins acts as a "master" machine while WAPT Pro
(WAPT Cloud) like any other remote test
utility runs on a "slave" machine.
It is necessary to configure Jenkins to run WAPT Pro (WAPT Cloud) remotely.
To create a remote WAPT Pro job in Jenkins:
- In the management screen of Jenkins, click Manage Jenkins -> Manage Nodes -> New Node to add a new slave machine. Specify the slave machine settings, as described in the Jenkins documentation.
- In Jenkins homepage, click the New Item to create a new job.
- Type a name for your new job.
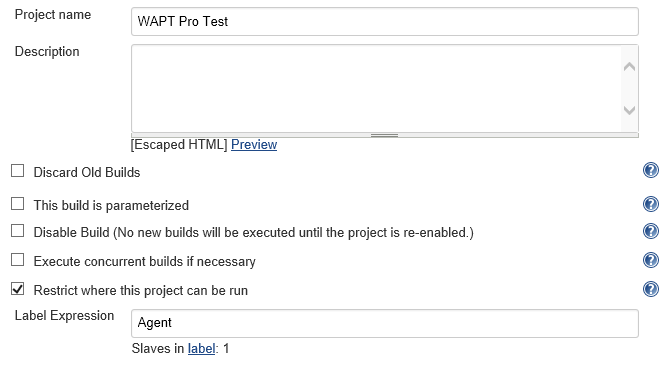
- Check the Restrict where this project can be run option and enter the label of the created node.
- In the Build section, specify the execution command with the necessary command arguments.
For details, see the previous section Creating a new WAPT Pro item.
This command will be executed on the slave machine. All build artifacts are saved in the "workspace" on the slave machine.
- Configure the Post-build Actions. Select the Archive the artifacts command and
specify files to archive.
You can use wildcards like it is shown in the example below. The base directory is the "workspace".
"Archive the artifacts" command archives the build artifacts (WAPT Pro HTML report and results) in the specified location on the slave machine and puts them to the corresponding folder with the current build info on the master machine.
Select the second post-build action Publish WAPT Pro reports and enter the location of WAPT Pro report file on the master machine.
- Save the new item and start a build to get WAPT Pro reports in Jenkins.
Making a build for WAPT Pro item
WAPT Pro
plugin for Jenkins uses the settings of WAPT Pro when making builds in Jenkins, in particular,
the information about the used load agents. You should specify the load agents for current scenario in the
WAPT Pro workplace beforehand. Also it is recommended to check that the test can be executed normally
from the WAPT Pro workplace before creating Jenkins jobs for the scenario.
After that (when everything is configured in the WAPT Pro workplace),
it is not necessary to keep the workplace open on your computer.
Jenkins starts WAPT Pro automatically when you click the "Build Now" button.
After making a build, the running instance of WAPT Pro is closed. The next time you make a build,
another instance of WAPT Pro is started.
Note that you cannot run tests in WAPT Pro and make builds for the
WAPT Pro item in Jenkins at the same time.
You can check the Jenkins Console Output for any build to know how it was performed.
Reading WAPT Pro reports in Jenkins
For every build performed in Jenkins, WAPT Pro plugin allows displaying the
HTML report with the results of test run just in Jenkins. You can see the HTML report for every successful build.
HTML report is available from the context menu of the job in Jenkins dashboard:
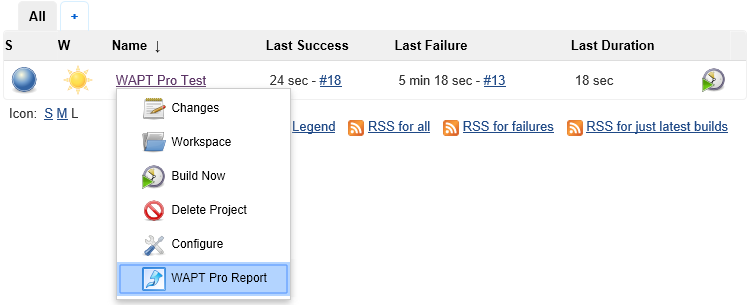
or from the project menu:
If you select one of these options, you will see the last generated HTML report.
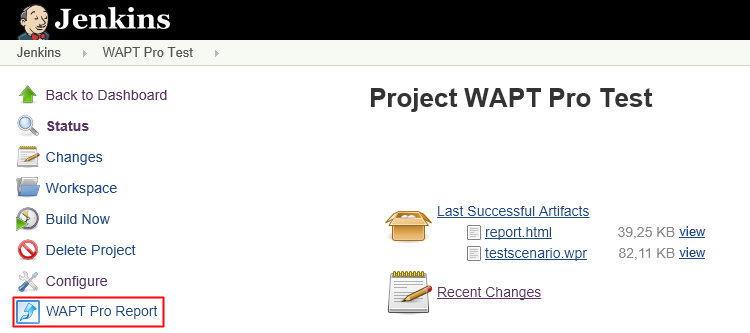
To view the HTML report of any previous build,
select the "WAPT Pro Report" option on the context menu of the necessary build:

HTML report looks as follows:
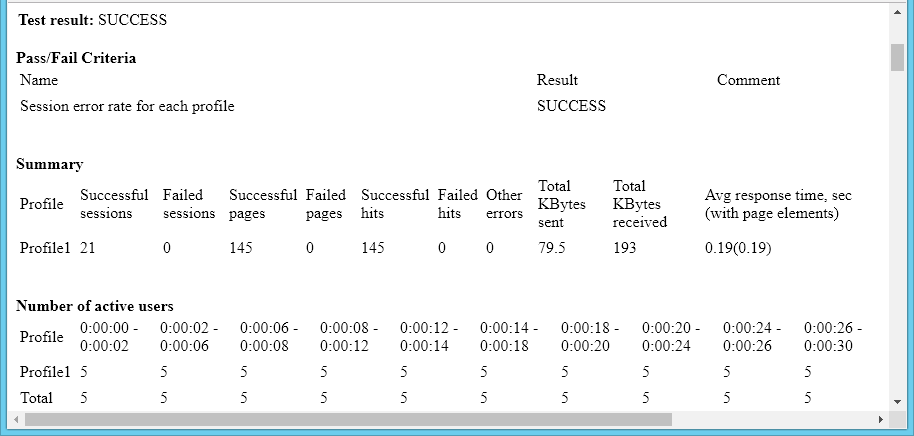
Here you can see the detailed description of WAPT Pro HTML reports.
Uninstalling WAPT Pro plugin for Jenkins
Removing WAPT Pro plugin for Jenkins is performed in the Jenkins interface.
- In the management screen of Jenkins, click Manage Jenkins, then select Manage Plugins.
- Select the Installed tab where all the active plugins are listed.
- Locate the WAPT Pro plugin and click the Uninstall button.
- Restart Jenkins.
Troubleshooting
If something goes wrong with your WAPT Pro item in Jenkins, first of all take a look at the
Jenkins Console Output. You can open that output window for any build. It includes WAPT Pro console
log along with the Jenkins data.
The most common problem is when Jenkins cannot access some of the files referenced in your scenario or profiles. Note that Jenkins
uses some system account to run its jobs. This account may be different from your own user account. It can have different access rights
and network drive configuration. You need to make sure that all referenced files are accessible under Jenkins account. Alternatively
you can fix this problem by copying all the required files to the Jenkins "workspace" folder.
Other possible problems may be related to the WAPT Pro configuration. For example, it may be unable to
locate load agents, if you do not specify them in WAPT Pro workplace beforehand. It is recommended to check
that the test can be executed normally from the WAPT Pro workplace before creating Jenkins jobs for the scenario.
If you still have a problem running your WAPT Pro item in Jenkins, please copy the Jenkins Console Output for
that item and send it to our Technical Support team:
support@loadtestingtool.com.
We will be happy to assist you!
![]()