Editing Page Requests
Requests inherit the properties of user profile which they belong to.
However, you can change some properties of individual
requests.
Click on any request in the Navigation Pane and you will see its properties in the right pane.
Information is divided into 2 parts and displayed correspondingly on the
Properties and Response processing tabs.
![]() Properties
Properties
On this tab you can edit the properties that form
the request. Use this tab before sending the request.
![]() Response processing
Response processing
On this tab you can analyze
server response. Use this tab after sending the request and receiving a response from the server.
Properties

![]() Name
Name
Here you can change the name of the current page. For example, instead of default names page_1, page_2,
you can type names with the certain meaning (for example, "Login", "Catalog",
"Forum" etc).
![]() Dependencies
Dependencies
"Dependencies" button in request properties shows the number of manual dependencies for current request.
This type of dependencies also includes dependencies based on cookies which are automatically recognized by
WAPT Pro during recording.
If a request uses a cookie which is set in one of the previous responses, it cannot be initiated
until the cookie value is received from the server. WAPT Pro automatically recognizes such dependencies
during recording and shows them in the Dependencies dialog. This dialog opens by clicking the "Dependencies"
button:

Here you can see the list of dependencies for current request.
Go To Source:
This button allows navigating to the source request for any dependence selected in the list. Source request
is a request where the necessary data (cookie value, link or something else) is received from the server.
Add..: Allows adding a new dependence for current request.
You can add dependencies between requests manually if you know exactly that some request is initiated only after receiving some data
from one of the previous requests. For example, if request B uses a link received in the response to request A,
you can add a new dependence for the request B. The source request is the request A where the necessary link comes in the server response.
Select a source request in the displayed dialog:

You can add a comment and click "OK" to save a new dependence.
Remove: Removes a selected dependence from the list.
Edit..: This button opens the "Select dependence" dialog where you can change the source request for current dependence
and enter a comment.
Note that "Dependencies" dialog shows only dependencies which you added manually and dependencies based on cookies which were automatically
found by WAPT Pro during recording.
Here you can read about other types of dependencies between requests in WAPT Pro.
![]() Load page
Load page
This option enables/disables the execution of current request.
If you unckeck it, then request will be excluded from test run.
If you disable a page containing resources, all its resources will be also disabled.
![]() Load resources
Load resources
This option defines whether page resources (images, CSS, JavaScript, WOFF online fonts and others) will be loaded during the test run or not.
All page resources are sub-requests of the main page in the left view.
If you uncheck this option, then the page will be loaded without images and other resources.
This option is available in request properties only in case the corresponding option Load page resources
is turned on in profile properties.
If you uncheck that option in profile properties, then all pages of current profile
will be loaded without resources.
![]() User think time after page load (ms)
User think time after page load (ms)
This option is available only in case you have chosen the option Specified in page properties
for user think time in the properties of current profile.
Specify 2 values: minimum and maximum. The delay
will be taken from the specified range at random. If you want to set a constant value of delay,
specify the equal limits of range.
![]() Server
Server
Here you can modify server name and port number.
WAPT Pro supports the usage of variables in the names of servers.
This feature allows you to test different servers simultaneously. For example, you can define a variable
"server-name" calculated using one of WAPT Pro
functions so that its values are various names of
servers. You can incorporate this variable into the Server field
to get different server names for different users/sessions/loop iterations (it is specified in function
properties).
Enter the $ sign in the Server field and you will see a prompt
with the list of available variables (defined on the previous pages).

Select a desired variable in the list to incorporate it into the server name.
You can add as many variables to the name of server as you need.
![]() HTTPS
HTTPS
Mark this checkbox if you wish to test pages that require SSL connection.
URL address of such pages will start with https://.
During test run, all the necessary settings for secure connection will be taken from
the HTTPS tab of "Settings" dialog, namely, the version of SSL and
SSL client-side certificate (in case the server requests such certificate).
![]() HTTP/1.0, HTTP/1.1 or HTTP/2
HTTP/1.0, HTTP/1.1 or HTTP/2
During recording WAPT Pro recognizes the type of requests: HTTP/1.0, HTTP/1.1 or HTTP/2.
The type of current request is shown in this combo-box.
![]() URL Path
URL Path
You can use either recorded URL, or get it dynamically at run-time. To get URL dynamically, you
should use variables. Enter the $ sign in the URL Path field and you will see a prompt
with the list of available variables (defined on the previous pages).

Select a desired variable in the list and it
will be added to URL path. In this way you can add as many variables as you need.
Encode: This option defines whether to encode the URL path or not when it is transferred to the server.
Some sites accept the data in raw format only. For such sites you can disable encoding - just
uncheck this option.
![]() Method
Method
When the client (such as a web browser) sends a request to web server, the first thing it specifies is an HTTP command
(called a method). It tells the server what type of action it wants to be performed.
WAPT Pro supports the following methods of sending parameters to the server:
![]() GET
GET
![]() POST
POST
![]() HEAD
HEAD
![]() PUT
PUT
![]() DELETE
DELETE
![]() PATCH
PATCH
![]() TRACE
TRACE
![]() OPTIONS
OPTIONS
GET method
The GET method is a way of passing parameters of an HTTP request from the browser to the server. This method puts the
parameters, usually separated by special characters such as ampersands (&), in the URL itself, which is viewable to
the person using the browser.
The GET method is used to retrieve web pages from the server. It tells
the server to pass a copy of the document back to the browser or run a CGI program.
GET is also used to send user information from an online form on a web page to the server. Through this, the data is sent
as a part of the URL in 'name-value' pairs.
Using the GET method:
![]() Your entire form submission can be encapsulated in one URL.
Your entire form submission can be encapsulated in one URL.
![]() It is how your browser downloads most files.
It is how your browser downloads most files.
![]() It is used to get a file or other resource.
It is used to get a file or other resource.
![]() Do not use GET if you want to log each request.
Do not use GET if you want to log each request.
Suppose, you recorded a request http://host/path which has several parameters:
param1=value1
param2=value2
param3=value3
When you use the GET method, the following URL is sent to the server:
http://host/path?param1=value1¶m2=value2¶m3=value3
As you can see, parameters are attached to the end of URL path
after a question mark and are separated from each other by ampersands (&).
You can define the list of parameters on the URL Parameters tab of request properties.
WAPT Pro provides you with a number of
functions for dynamic calculation
of request parameter values at run-time.
Use Add, Remove and Edit buttons to manage the list of parameters.
With the help of Move Up and Move Down buttons you can change the order of parameters in this list.
Besides, you can copy any parameter from the list of parameters of any request to the current list using the
Copy and Paste options on the right-click menu.
In case the value of some parameter is calculated using the function
$Var, you can see the
following prompt when you move the mouse cursor over that parameter in the list of parameters:

The prompt shows the value of used variable and also on which page it is initialized. If you click the displayed link, you
will get to that place where variable is initialized.
Encoding: In this column you can select the type of encoding for each parameter:
![]() No encoding
No encoding
![]() Form Url Encoded
Form Url Encoded
![]() EncodeURI
EncodeURI
![]() EncodeURIComponent
EncodeURIComponent
![]() Escape
Escape
Here you can read the description of these encoding standards: for
EncodeURI,
for EncodeURIComponent,
for Escape encoding,
for Form Url Encoded (application/x-www-form-urlencoded).
Default encoding for GET-requests is EncodeURIComponent, for POST-requests - EncodeURI.
Find Value..: If you select some parameter in the list and click the Find Value button, you will see
the Find and Replace dialog with the value of selected parameter
entered in the search string. Put the necessary checkmarks to specify where the search will be done. Click
Find Prev, Find Next or Find All button to
search for the entered value of parameter.

Note that Find Value button is disabled for non-static parameters.
Parametrize: This button facilitates the process of parameterization,
especially in cases when you have many parameters with the same value.
POST method
The POST request method is used when the browser needs to send data to the server as part of the request,
such as when uploading a file or submitting a completed form.
In contrast to the GET request method where only a URL and headers are sent to the server, POST requests also include a
message body. This allows for arbitrary length data of any type to be sent to the server.
Using the POST method:
![]() Query length can be unlimited (unlike the GET method).
Query length can be unlimited (unlike the GET method).
![]() It is used to send a chunk of data to the server to be processed.
It is used to send a chunk of data to the server to be processed.
![]() You can send entire files using POST.
You can send entire files using POST.
![]() Your form data is attached to the end of the POST request
(as opposed to the URL).
Your form data is attached to the end of the POST request
(as opposed to the URL).
![]() The usage of POST method is not as quick and easy as the usage of
GET, but more versatile.
The usage of POST method is not as quick and easy as the usage of
GET, but more versatile.
If you select the POST method, you will see a new tab POST Parameters. On this tab you can define the list of parameters
that will be transmitted in the body of HTTP request. POST request can also have GET parameters. They are transmitted in the
request string. GET parameters are displayed on the URL Parameters tab.

POST parameters type:
WAPT Pro supports several types of POST requests:
Form-Data, Multipart/Form-Data, Text, AMF, SOAP-MSBIN, MSBIN, JSON, GWT and Binary.
![]() Form-Data
Form-Data
If you select Form-Data, then parameters will be transmitted in the body of HTTP request
as the following string:
param1=value1¶m2=value2¶m3=value3.
![]() Multipart/Form-Data
Multipart/Form-Data
If you select Multipart/Form-Data content type, parameters will be also transmitted in the body of HTTP request,
but in the different way:
------Boundary
Content-Disposition: form-data; name="param1"
value1
------Boundary
Content-Disposition: form-data; name="param2"
value2
------Boundary--
Content-Disposition: form-data; name="param3"
value3
------Boundary--
Here
you can read more about the Multipart content type.
Note that if you transfer a file, the program will use Multipart/Form-Data content type by default.
![]() Text
Text

If you select this option, you will be able to enter any text string in the box
below. The specified text string will be sent as the body of HTTP request.
You can use variables as well.
Type $Var(variable_name) where variable_name
is the name of some variable.
Content type: Here you should specify request content type
(for example: text/html, text/xml etc).
If a recorded POST request has the content type "application/json", it is considered as JSON request.
WAPT Pro
performs obligatory JSON parsing of such requests. A special
Module for JSON format
is required in this case.
![]() AMF
AMF
You can install a special
Module for Adobe® Flash® Testing
to test AMF requests.
![]() SOAP-MSBIN or MSBIN
SOAP-MSBIN or MSBIN
These formats relate to Microsoft Silverlight - a web-browser plug-in
for creating and delivering rich Internet applications and media experiences on the web.
To use these types of POST requests, you should install a special
Module for Silverlight testing.
![]() GWT
GWT
You can install a special Module for GWT Testing to test GWT requests.
![]() Binary
Binary
If WAPT Pro cannot recognize some data during recording, it identifies that data as binary.
If you need to edit the binary data to parameterize your profiles, you can install a special Module for Binary Formats.
HEAD method

This method is used to find information about a document located on the server not retrieving it.
The HEAD method is identical to GET except that the server MUST NOT return a message body in the response.
The metainformation contained in the HTTP headers in response to a HEAD request SHOULD be identical to the information sent
in response to a GET request.
This method is often used for testing hypertext links for validity, accessibility and recent modification.
These are cases when it is necessary to check
characteristics of a resource without actually downloading it, thus saving bandwidth.
Below is an example of HTTP-transaction using HEAD request.
Request:
HEAD /index.html HTTP/1.0
Connection: Close
User-Agent: Mozilla/4.05 (WinNT; 1)
Host: www.ora.com
Accept: image/gif, image/x-xbitmap, image/jpeg, image/pjpeg, */*
Server response:
HTTP/1.0 200 Document follows
Date: Fri, 20 Jan 2011 08:17:58 GMT
Server: Apache/1.2.6
Last-modified: Mon, 17 Jun 2010 21:53:08 GMT
Content-type: text/html
Content-length: 2482
(The server does not return a message body in the response.)
PUT method
The PUT method is used for creation of a new resource with a specified URI. If the resource with such URI already exists,
then the body of request is considered to be its updated version.
The PUT method is a mechanism allowing a browser to transfer a file to a web server. So it is used for uploading files
to web servers providing a useful alternative to FTP uploading.
The PUT method is similar to the POST method in that it can cause information to be updated on the server. The difference
is that the POST method is normally handed a script which is explicitly named by the resource (that is, something that
already exists), while a PUT request could be directed at a resource which does not (yet) exist. Another difference is that
the POST method can be used in response to a form, while the PUT method can only contain a single data item. The PUT method
is suited for publishing pages.
PUT parameter type: WAPT Pro supports
several types of PUT requests:
Form-Data, Multipart/Form-Data, Text, AMF, SOAP-MSBIN, MSBIN, JSON, GWT and Binary (the same as for
POST requests).

DELETE method
The DELETE method is used for deletion of a resource having a specified URI.
Similar to the POST requests, the DELETE requests have a body. WAPT Pro supports several types of
DELETE requests: Form-Data, Multipart/Form-Data, Text, AMF, SOAP-MSBIN, MSBIN, JSON, GWT and Binary (the same as for
POST requests).

PATCH method
The PATCH method is designed to do a partial resource modification,
to modify an existing HTTP resource. It is similar to the PUT method,
however PUT can only do a complete replacement of a document.
The PATCH method is similar to the POST method. PATCH requests have the list of PATCH parameters and the list of URL parameters.
TRACE method
The TRACE method performs a remote, loop-back test of the request message along the path to the target resource.
TRACE allows the client to see what is being received at the other end of the request chain and use that data for testing or diagnostic information.
The TRACE method is similar to the GET method. TRACE requests have the list of URL parameters.
OPTIONS method
The OPTIONS method is used by the client to find out the HTTP methods and other options supported by a web server.
The client can specify an URL for the OPTIONS method, or an asterisk (*) to refer to the entire server.
The OPTIONS method is similar to the POST method. OPTIONS requests have the list of OPTIONS parameters and the list of URL parameters.
![]() Code page
Code page
Here you can select encoding that will be used during test runs
for request parameters containing text strings.
You will need this option for testing multilingual web sites.
When WAPT Pro records a page, it uses the
encoding specified in Internet Explorer options.
During test runs, WAPT Pro uses the encoding selected in the
Code page combo-box.
Default encoding here corresponds to the default locale in your
Regional Options (Start -> Settings -> Control Panel -> Regional Options).
However, you can select any other encoding for your requests, and
it will be used during test runs.
![]() HTTP Headers
HTTP Headers
On the HTTP Headers tab of request properties you can see the list of HTTP header strings of current page request.
There are 2 types of headers: default (inherited from the profile and used for all its requests) and HTTP headers of
individual requests.
Headers marked with the grey color are generated automatically on the basis of data received from profile or current request.
You cannot modify or remove these headers. You can only change their order in the list using the
Move Up and Move Down buttons on the right.
HTTP headers of individual requests are marked with the black color. They are accessible for editing.

To edit some header in the list, double-click its name or value, modify it and press Enter. Or
use the Edit Name and Edit Value buttons on the right.
You can use variables in the names of headers. Double-click header name,
enter the $ sign and you will see a prompt with the list of available variables.
Select a desired variable in the list to incorporate it into the header name.
In the Overwrite column you can define what to do with the new values of selected header. You can
choose one of 3 options: "New line", "Overwrite" or "Append".
![]() New line: New values of this header will be written on a new line.
New line: New values of this header will be written on a new line.
![]() Overwrite: The default header will be overwritten with the new values.
Overwrite: The default header will be overwritten with the new values.
![]() Append: New values will be appended to the default header.
Append: New values will be appended to the default header.
If you double-click the Referer header, you will see the following dialog:

You can either enter the Referer path, or select the Referer request from the list.
If you leave the Referer value empty, WAPT Pro will use the previous request for the Referer path.
Response processing
On the Response processing tab you can view and modify the list of variables that will be used during test run.
You can also view the recorded HTTP request and server response that was received during the recording process.
You can specify additional validation rules that will be applied to server response during test run.

![]() Variables
Variables
You can use variables to calculate the values of parameters and form the correct URL paths. To define a variable,
you can use special WAPT Pro functions that parse the actual HTML code of response at run-time.
![]() Add..: Opens the Add Variable dialog where you can
define a new variable and a function for its calculation.
Note that created variable will be available only in subsequent
requests.
Add..: Opens the Add Variable dialog where you can
define a new variable and a function for its calculation.
Note that created variable will be available only in subsequent
requests.
![]() Remove: Removes selected variable from the list.
Remove: Removes selected variable from the list.
![]() Edit..: Opens the Edit Variable dialog
where you can modify the properties of selected variable: name and function for its calculation.
Edit..: Opens the Edit Variable dialog
where you can modify the properties of selected variable: name and function for its calculation.
![]() Move Up: Moves the selected variable one step up in the list.
Move Up: Moves the selected variable one step up in the list.
![]() Move Down: Moves the selected variable one step down in the list.
Move Down: Moves the selected variable one step down in the list.
With the help of Move Up and Move Down buttons you can set the order of calculation of variables.
Besides, you can copy any variable from the list of variables of any request to the current list:
- Select the necessary variable in the list of variables on the Response processing tab of any request.
- Right-click it and select Copy on the pop-up menu.
- Return to the current list of variables.
- Select Paste on the right-click menu.
WAPT Pro performs optimization of variables. If some variable is not actually used for parameterization of requests, it is not created during the test. All used variables with their values are represented in user's log for each request (in the Logs view).
WAPT Pro has several internal variables:
This section includes several tabs where you can see the recorded HTTP request and server response that was received during the recording process.
Request Header: Here you can see the HTTP header of recorded request. You can select different representations in the "View as" combo-box: "Binary" (to view the data in the binary form), "Text" (to view the data in the text form) and "Url parameters" (to see the list of URL parameters), for example:

URL parameters are transmitted in the URL path directly; they are attached to the end of URL path after a question mark. If a request does not have URL parameters, this list is empty.
Request Body: The body of recorded request is shown on this tab. You can select different representations in the "View as" combo-box: "Binary" (to view the data in the binary form), "Text" (to view the data in the text form) and additional option for POST requests: "Form Data" or "Multipart Form Data" depending on the type of POST request. The last option allows you to see the list of POST parameters - parameters transmitted in the body of HTTP request, for example:

Response Header: Here you can see the HTTP header of server response. You can select different representations in the "View as" combo-box: "Binary" (to view the data in the binary form) and "Text" (to view the data in the text form).

Response Body: The body of server response is displayed on this tab. You can select different representations in the "View as" combo-box: "Binary", "Text" and "Browser View".
If you select "Binary", you will see the data in the binary form:

If you select "Text", you will see the data in the text form:

If you select "Browser View", you will see the server response as it is displayed in browser without images. If the displayed web page has incorrect language encoding, you can select another encoding for it.

In case you select the "Text" representation on these tabs, you can search for some text string in the html code.

Find: Type the text that you want to find. The program will highlight all occurrences of the entered text.
Use the Previous and Next buttons to move to the previous/next occurrence of the text.
Recorded Messages tab shows the sequences of incoming and outgoing messages recorded for current request. For each message you can see its time of recording calculated from the beginning of recording.
 .
. .
.
Here you can modify the value of baseline response time for the current request. Initially this value is set during recording; after that you can manually modify it or re-calculate it after the test verification using the following button.
Set baseline times from current results: Click this button to take the values of response time from current results and set them as baseline response times for load tests. If you click this button after verifying the test scenario, then verification results are set as baseline response times. If you click it after the test run, then WAPT Pro calculates the average value of response time for each request (it takes all values of response time for the particular request through the whole test run and calculates the average value). This value is set as a new baseline response time for that request.
By clicking the Set baseline times from current results button the following dialog appears:

Define the range for calculation of the average baseline time. Default range is the whole test run duration. You can choose any part of this interval.
Divide by the degradation factor: The average value of response time for each request is divided by this factor.
Performance degradation factor shows the degradation of performance under load. Response times received in load tests are greater than the same values received without load. As the baseline time is the response time without load, we should divide values taken from results by the specified factor to calculate the baseline time.
Apply to all requests in the current test: Check this option to calculate new values of baseline time for all requests in the current test. Otherwise, if this option is not checked, the new value of baseline time is calculated only for the current request.
WAPT Pro can make additional validity check of server response during test run.
Valid only if response body contains/does not contain _ : You can turn this option on and enter some text to check. Then WAPT Pro will check whether HTML code of server response contains the text that you specify here, or not. You can enter any part of HTML code, for example: <TITLE>302 Found</TITLE>. You can also use variables. Enter the $ sign and you will see a prompt with the list of available variables. Select a desired variable in the list to insert it into the text.
You can select one of 2 options in the combo-box: either "contains", or "does not contain".
In case the response is invalid, you will see the "Response body validation error" for this page request in a special table Validation errors on pages (hits) as a % of all completed pages (hits) of Errors Report, HTML Report and in the log.
Valid only if response time degrades less than _ times compared to the baseline: If you check this option, WAPT Pro will make additional validity check of response time. The program will treat server response valid if a ratio of the response time to the baseline time is less than the value specified here.
If this ratio exceeds the specified value, you will see the "Response time validation error" for this page request in a special table Validation errors on pages (hits) as a % of all completed pages (hits) of Errors Report, HTML Report and in the log.
Apply profile validation rules: This option defines whether to apply profile validation rules to the current request or not.
First, the program applies validation rules specified for the current request. If this check is passed successfully and if the option Apply profile validation rules is turned on, then the program applies validation rules specified for the profile.
Ignore HTTP errors: This option allows to ignore HTTP errors, so that if this request is executed with HTTP errors, it is considered successful and such errors are not included in test statistics. However, you can look at the Response codes table in the Errors report to know which pages have HTTP errors.
Do not follow redirect: By default, this option is turned off and requests can follow several redirects before they get the final response code 'Success' or 'Error'. In the example below the selected page got three redirects before it got the final response code "200 OK" ("Logs" view):

If you check the option "Do not follow redirect", then requests will not follow redirects. If some page receives a response with the redirect location, the program goes to the next page in the test sequence. So you should manually add the necessary requests to the test sequence for redirected pages.

Copying parameters/variables from one request to another
When you parameterize your profiles, you often need to create the same variables in different requests.
To simplify this process, WAPT Pro supports:
![]() multi-selection of parameters/variables in the list
multi-selection of parameters/variables in the list
![]() copying the selected parameter/variable to the clipboard
copying the selected parameter/variable to the clipboard
Thus, you can select several variables (or parameters) at once, copy them to the clipboard and paste to another request.
Find a text string in request/profile properties and recorded data
You can search for some text string in request/profile properties and recorded data:
headers and bodies of recorded requests and responses.
Use the Find and Replace option on the Edit menu for this purpose.
When you click this option, the following dialog appears.
 Find what: Type the text that you want to search for.
Match case:
If you check this option, WAPT Pro will search only for words that match the case of
the word or phrase that you typed in the Find what box. For example, if you search for "PAGE", the result includes
"PAGE" but not "page".
Decode/Encode: Using these buttons you can decode/encode the entered value.
The following options define where the entered value will be looked in.
![]() Current Request:
Select this option to search in the current request.
Current Request:
Select this option to search in the current request.
![]() Current Profile:
Select this option to search in the current profile.
Current Profile:
Select this option to search in the current profile.
![]() Entire Scenario:
Select this option to search in the entire scenario.
Entire Scenario:
Select this option to search in the entire scenario.
Below you see several groups of checkboxes. Put the necessary checkmarks to specify where the search will be done.
Do one of the following:
![]() To find the previous occurrence
of the text, click Find Prev.
To find the previous occurrence
of the text, click Find Prev.
![]() To find the next occurrence of
the text, click Find Next.
To find the next occurrence of
the text, click Find Next.
![]() To find all occurrences of the
entered text, click Find All.
Search results will be shown in the "Result list".
To find all occurrences of the
entered text, click Find All.
Search results will be shown in the "Result list".
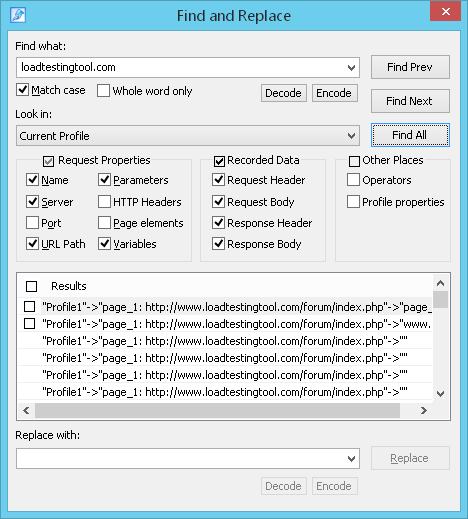
Find and replace a text string in request/profile properties
When you edit a test scenario, sometimes you may need to search for some text string in the properties of all
page requests and replace it with another text string. WAPT Pro allows you to do this:
you can quickly search for every occurrence of a specific word or phrase, or
automatically replace it with another word or phrase. Use the
Find and Replace option on the Edit menu for this purpose.
When you click this option, the following dialog appears.
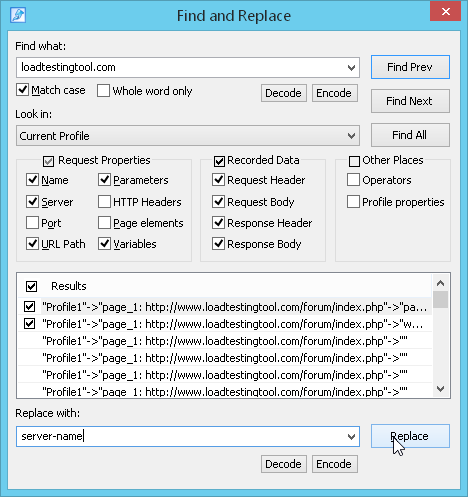 Find what: Type the text that you want to search for.
Below you see several groups of checkboxes. Put the necessary checkmarks to specify where the search will be done.
Note that you cannot replace the text in the recorded data
as it is inaccessible for editing (headers and bodies of recorded requests and responses).
You can make replacements in the properties of requests, profiles and operators.
Replace with: Type the replacement text.
Decode/Encode: Using these buttons you can decode/encode the entered value.
Follow the steps below to replace the text:
1. Click Find All to find all occurrences of the entered text.
Search results will be shown in the "Result list".
2. Put checkmarks for those items in the list where you want to replace the text.
Checkboxes are displayed only for those items which are accessible for editing.
If an item has a read-only access, it does not have a checkbox in this list (e.g. the recorded data).
3. Click Replace. This button replaces all selected occurrences of the text.
![]()