Variables and parameters

In the previous post I demonstrated how to parameterize a simple profile. That profile consisted of only three requests. First request opened the main page of a web forum with sub-forums listed on it. Second request opened one of the sub-forums. Third one opened a topic inside that sub-forum.

The goal of the parameterization was to make WAPT open a random sub-forum on the second step and a random topic on the last step. Initially both were recorded as constant values.

The main idea was that when we want the value of a certain request parameter to be dynamic, we can use special functions to extract it from server response to the previous request. While this worked perfectly for our simple example, this does not seem to be a general way to handle such situations. What if the required value is contained in the response to, say, 5th request of a profile, and it should be used in the 10th request?

The answer is: we can extract that value to an internal variable and then use that variable in any subsequent request. I mentioned this mechanism before when I wrote about extracting values from hidden controls in HTML forms. Now I am going to show how to do this with other values.

I will continue using the same example and will simply change the parameterization. Basically I will use the same “Search” function that finds a value surrounded by two boundaries, but this time I will extract that value to a variable.

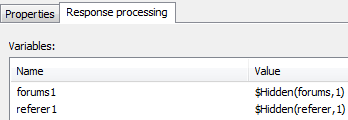
I select the first request in the left view and the “Response processing” tab in the right view. This tab specifies what WAPT should do with the server response to the selected request during the testing. The most important thing here is the definition of variables. The list of variables is shown at the top of the page. Initially it contains only values of hidden form controls for which the variables are created automatically.

Initial list of variables

Now let’s add a new variable for the number of sub-forum. I click the “Add…” button near the variables list. The “Add variable” dialog is displayed.
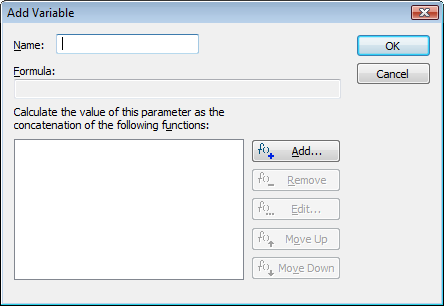
Add variable dialog

This dialog is very similar to the “Edit parameter” dialog that is used to specify how to calculate the value of a parameter. Actually, sometimes people even mess parameters of a request and WAPT internal variables. Even though both things are specified in a very similar way, they are completely different in meaning. The variables are used to store values during a user session. It is a very common practice to extract a value into a variable and then assign the value of that variable to a parameter of a subsequent request. This is exactly what we want to do now.Watch Full Movie Online Streaming Online and Download

I specify the name for our new variable and click the “Add” button to add an extraction function. This will be the “Search parameter” function specified as follows.
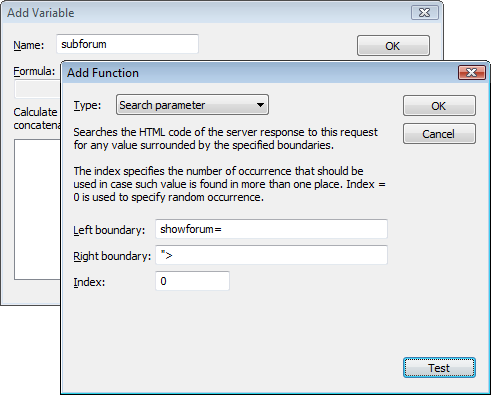
Extracting a value into a variable

I use the same right and left boundaries that we used before.

Now I need to specify how to use the created variable. I select the second request in the left view. We need to change its showforum parameter. I click the “Edit” button to open the “Edit parameter” dialog, and one more “Edit” button inside it to open the “Edit function” dialog. Here I select “Variable” for the function type and click the “Select…” button near the variable name. I could simply type the variable name, but this dialog provides a more convenient way.
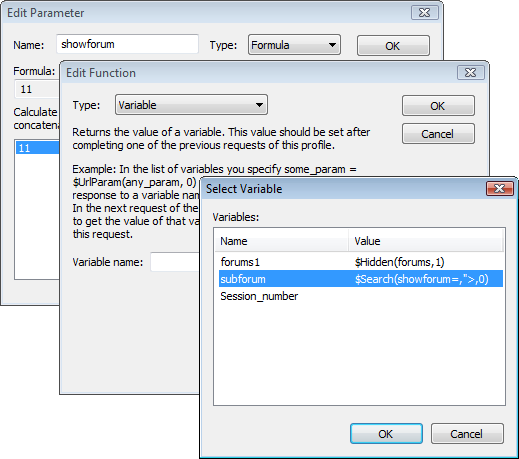
Assigning a variable

By the way, note the Session_number variable. It is always present in the list and contains the number of the current user session starting from 0. It is very useful sometimes, if you need to have some unique value for each user session.

Basically that is all. We can repeat the whole procedure for the topic number in the third request and verify the test. If we do everything correctly, the verification log will be absolutely the same as before.

So, in short: when we need to use a value contained in the latest server response, we can extract it directly to a parameter. However if we need to use an “older” response, we have to create a variable in the processing of that response and extract the value to that variable. Only after that we can use it in subsequent requests.
Why is this important? In old days all page requests inside user sessions were created by users clicking links and buttons on the web pages. In such case you would never need to extract data from “old” responses, because the only content available for the browser at the moment of sending next request was the current page. So, any data included in the request could have been taken either from current page or from direct user input.

That was simple… But then they invented JavaScript and AJAX. Now while you are browsing a page containing AJAX, your browser can send additional requests to the server and receive additional data from it to update the current page without fully reloading it. As a result, the page that you see when sending the next request actually contains data received in several server responses, so you need to have a way to extract values from any of them.
Posted in WAPT usage | Tagged , , , , | 37 Comments

Extracting values from server responses

In this post I will continue using the profile mentioned here as an example. It contains a user session recorded at the following web forum: http://www.loadtestingtool.com/forum

The session is very simple: the user opens the main forum page, enters into a sub-forum by clicking a link on that page and then clicks another link to display a topic. I made a small modification to that profile: I removed requests to iframes, because they are static and do not play any role in the session. So, the whole session now consists of 3 requests:

GET /forum/ HTTP/1.1
GET /forum/index.php?showforum=11 HTTP/1.1
GET /forum/index.php?showtopic=2148 HTTP/1.1

As I mentioned before, the number of sub-forum in the second request is passed as the value of the showforum parameter. Same way the number of topic is included in the last request as the value of the showtopic parameter.

We can easily change these values to any other valid numbers. As a result, when the session is replayed, the virtual user will open sub-forums and topics with the corresponding numbers. However this is not what we usually need when performing a load test, because we want different users to perform similar, but still different actions on the web site.

In our case it would create a much more realistic load on the web site, if each virtual user in each session would enter into a random sub-forum and then open a random topic inside that sub-forum. In other words, it should click a random link to a sub-forum on the first page and then click a random topic link on the next page. I am going to show how to implement such parameterization of this profile with WAPT.

First of all, let’s review the content of the main forum page. It contains many links to different sub-forums. I pasted several lines from the raw HTML code of that page below.

…
<b><a href="http://www.loadtestingtool.com/forum/
index.php?showforum=11">How to solve my problem</a></b>
…
<b><a href="http://www.loadtestingtool.com/forum/
index.php?showforum=6">Test Scenario Creation</a></b>
…
<b><a href="http://www.loadtestingtool.com/forum/
index.php?showforum=9">User Session Emulation</a></b>
…

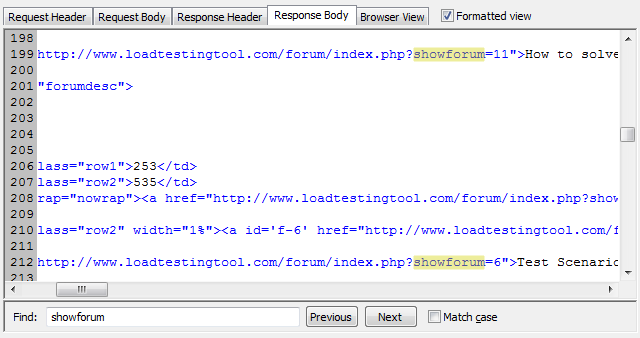
By the way, it is very easy to find anything like that inside a recorded server response using WAPT. You just need to select the corresponding request in the left view and then open the “Response processing” tab in the right view. Here you can use the “Find” feature to find and highlight all occurrences of the search string.

Search in response

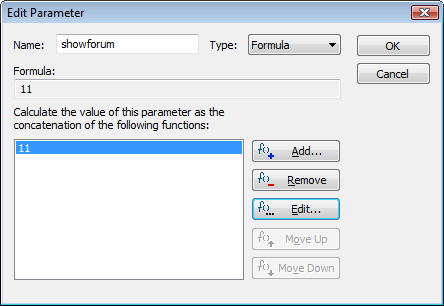
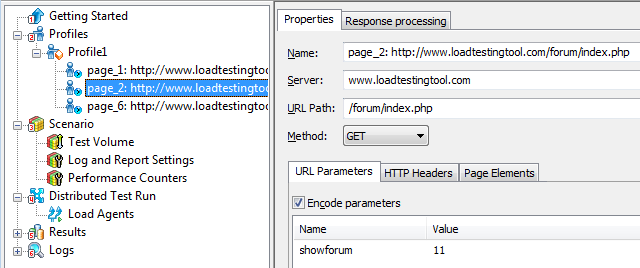
So, as we see now, all links to sub-forums are very similar to each other. They are different only in the values of the showforum parameter that we need to extract from here. Now I select the next page_2 request in the left view. This is the request that opens a sub-forum. The right view displays the request properties, including the showforum parameter specified for now by the static value (“11”).

Request parameter

I want to change the specification of this parameter, so that in each user session WAPT would open a random sub-forum. I select the parameter and click the “Edit” button. The “Edit Parameter” dialog is displayed.

Edit parameter dialog

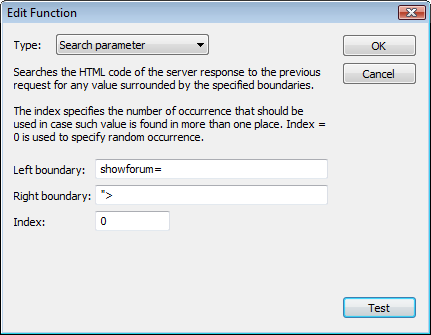
I click the “Edit” button in it to change the function that calculates the value of that parameter. I change it from “Static test” to “Search parameter” and specify the following options for it.

Search function

As follows from the specification of this function, it searches the content of the latest server response (in our case it is the content of the main forum page, the response to page_1) in order to find a string of text surrounded by the two specified boundaries.

In general this function can find several occurrences satisfying this condition. This is exactly what happens in our case. That is why I specified “0” in the Index option. This will make the function return random occurrence.

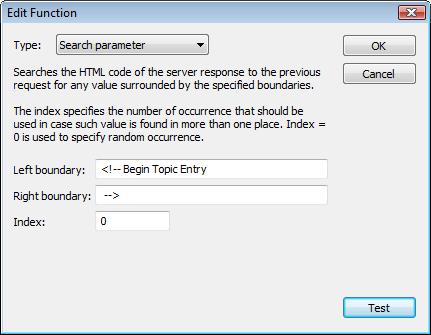
The showtopic parameter in the last request can be specified in a very similar way.

Topic parameterization

Note that it is not necessary to extract the data from an URL. In the above example I specified boundaries so that the number is taken from a comment inside the HTML code of the page. We only need to make sure that the corresponding part of the code is always provided by the server.

Now let’s check how it works. I click the “Verify test” button on the toolbar to execute a sample user session with our profile. After the process is finished, WAPT shows the following log.

First log

Now I verify it again and check the log. The parameterized values are different. This confirms that the randomization works as expected.

Second log

Now I can specify test volume and execute the test with several users. If I enable full logging for the test run (it is disabled by default for efficiency reasons), I can see that all executed sessions have randomized values of the mentioned parameters. So, different virtual users open different topics on the web site, thus demonstrating a rather realistic behavior.

Posted in WAPT usage | Tagged , , , , | 1 Comment

Verifying a test before run

Designing a test for a web site with essentially dynamic content may be a rather complex and time consuming task. It is similar to programming in some respect. Even though there are good testing tools that let you automate the process and make it more transparent, still it is hardly possible to parameterize a profile in one step. In practice it is rather an iterative process when you parameterize the requests one by one. In this process you need to see what you get on each step. For this purpose you don’t need to launch the partially prepared test. Instead, you can verify it.

Verification is done by running the test with only one virtual user to simulate only one user session. Of course, this will not create any significant load on the web site. So, we will not verify the specified load, but we can check if the profile works correctly or not. If everything is ok (which means that we completed the parameterization), we can proceed to the full test run.

Let’s see how this is done in practice using a small and easy to demonstrate example. I will record a simple profile using the following web forum: http://www.loadtestingtool.com/forum

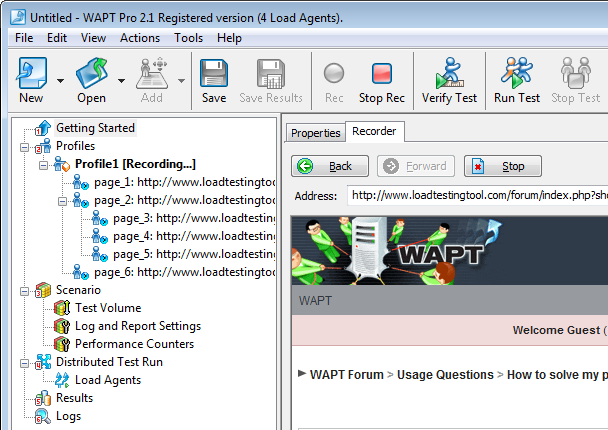
Our virtual user will simply click a link on the main forum page to open a sub-forum and then click another link to open a topic. As usual, I will use the WAPT tool for this purpose. I click the “Rec” button on the toolbar, enter the above URL to the address bar, and make couple clicks on the site inside the embedded browser window.

Recording a profile

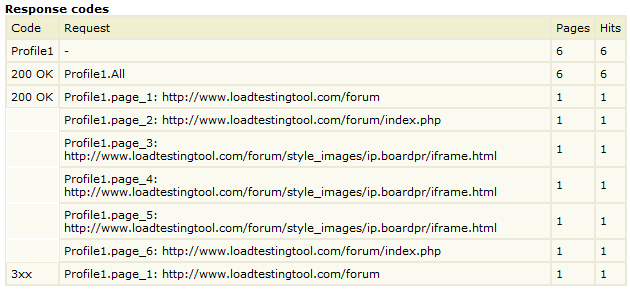
When this is done, I click the “Stop Rec” button to stop recording, and then click “Verify test” to perform the verification. It takes some time to complete the user session. After that a short report is shown. It contains the response codes for all pages requested during the user session.

Verification report

Even though this report provides some useful information, it is not sufficient for the verification purposes. What we really need is the complete information related to each request and response. It can be found in logs.

I do not mean reading huge text files. WAPT provides a very convenient way to get all the logged information in a structured form. I expand the “Logs” folder in the left view and select the only user session available here after the test verification. This is what I see in the right view.

Verification log

All the requests of the verification session are listed here. I can select any of them and see the details in the lower part of the window:

Request details

Each tab contains the content of the corresponding part of the request and response. So, for each request we can see what exactly was sent to the server and received in reply.
For example, we see that page_2 request contains the showforum parameter, which obviously specifies the number of sub-forum that I opened from the start page. Similarly, page_6 request contains the showtopic parameter that specifies the number of topic we opened in the sub-forum. The values of these parameters (11 and 2148) are also shown here.

Now let’s make couple experiments. First, I will change the URL of the last request to an incorrect one and verify the test again. This is what I see in the log now:

Log with an error

WAPT marked the corresponding response with red color because server returned an error in reply. The “HTTP Response” column in the log now contains the “404 Not Found” line for this request. The 404 status code indicates an error.

In my second experiment I will try to change the topic number in the last request and verify the test again. I intentionally use a wrong number for which the topic does not exist, so we may expect the server to return an error again. However, surprisingly the log shows that the verification completed successfully (note that the topic number in the request is different now):

Wrong parameter value

In fact, this is a very common situation and it is very important to know about that. If server receives incorrect data in request, it can either reply with an HTTP error code, or return an error in the human readable form. Let’s take a look at the page content of the page_6 response. It is available on the “Browser view” tab below.

Error message

Even though the status code for this response is 200, meaning the successful request completion, its body contains an error message. So, it is important to review all server responses to all requests in order to make sure that the test is correct and can be launched at full capacity.

Why is this so important? Believe it or not, but many people do not care if user sessions in their load tests are executed correctly or not. It seems that they think that in “Load Testing” the main word is “Load”. They record a user session, specify the number of virtual users and just click the “Run” button. In WAPT this can be done within a minute and you will even get a test report with all the usual data, including response times, bandwidth usages, etc.

Web sites have to reply to all requests, even to incorrect ones. However loading a web site with such requests is not useful at all, because this does not emulate the real load received by the server in production. Note that it takes much less system and database resources to send an error message in reply to an incorrect request, than to serve a good one.

Posted in Testing practice, WAPT usage | Tagged , , , , | Leave a comment

Using variables for parameterization

In the previous post I wrote about web forms containing hidden controls. The purpose of these controls is to pass some data from the server to the client and then receive it back in the next request (along with the other data submitted in the form).

However when a load testing tool, such as WAPT, replays a recorded user session, it does not create the submit request from the actual form. It only has the recorded version of that request. Its parameters contain data that was submitted on recording (read more on this here).

So, the load testing tool should somehow send the same request, but with different values of parameters, including the values taken from the hidden controls of the form contained in the latest response. In WAPT this is done with help of the variables.

The general concept is that you can create any variables during the user session. For each request in the profile you can specify which variables should be created and what values to assign to them after the request is completed. Usually this is done with help of special functions that extract data from the received server response. Each variable has a unique name within a profile, so if you assign a value to a variable with the same name in a subsequent request, this will be a reassignment to the same variable.

Now let’s see this on a very small profile example that I mentioned before. I select the second request of the profile in the left view in WAPT and switch to the “Response processing” tab in the right view. The name of that tab speaks for itself, because this is the place where we specify how to process the server response. The most important part of the processing is the extraction of values that are assigned to variables. So, in the list of variables for this response we see the following:

Variables

WAPT automatically finds all hidden controls inside the web forms on the pages returned by the server and creates variables for them. We see two variables here: forum1 and referer1. The names of the variables were created from the names of the corresponding controls. Numbers are added in order to be able to create other variables for the controls with the same names when processing other requests.

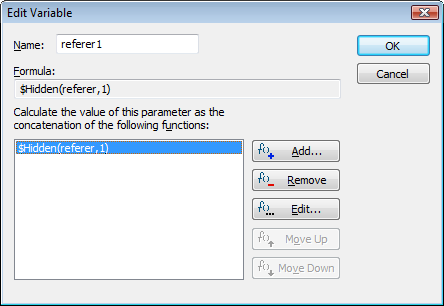
I select the referer1 variable and click the “Edit” button to check the details of the variable specification. The following dialog appears:

Edit variable dialog

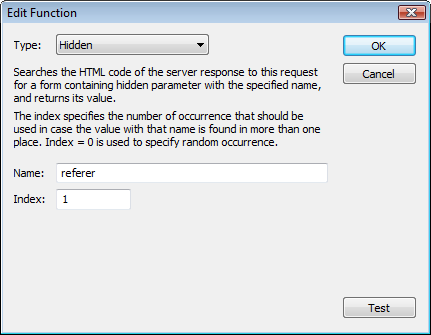
This dialog is very similar to the “Edit Parameter” dialog that I mentioned here. Actually, parameters and variables are specified in WAPT using the same approach: the assigned value is calculated as the concatenation of several specified functions. In most cases only one function is used. In our case this is a function called “$Hidden()”. I click the “Edit” button again to see the details of that function. This is what I see:

Hidden function

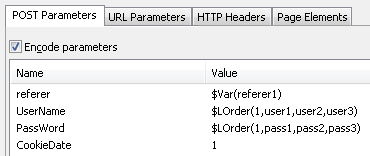
So, now we understand how the value of the referer1 variable is assigned. But how is it used? I select the third request in the left view and choose the “Properties” tab in the right view:

Using a variable

The parameter called referer is defined with help of the “$Var()” function. It is not hard to guess what that function does. It simply returns the value of the specified variable that was assigned during the processing of the previous request.

Now let’s understand how WAPT did that substitution. When it analyzed the recorded response to the page_2 request, it found two hidden controls and created a variable for each of them. Then it analyzed the parameters of the recorded page_3 request and found one that had the same name and value as the corresponding web form control on page_2. So, it replaced the static value for that parameter with the value of the created variable. That’s it!
But why is this important to know, if the whole thing was done automatically? Because this describes the general concept behind any parameterization of requests required to create correctly executing user sessions. In simple cases it can be done automatically, but as soon as things get more complex and less standard (which means specific for each web application), we need to do similar things manually. In such cases WAPT records sessions as is and we should modify the profile to replace static values of parameters with dynamic ones extracted from server responses. We need to tell WAPT how to extract them in each case.

Posted in WAPT usage | Tagged , , , , , | 1 Comment

Hidden controls in HTML forms

I would like to continue writing about the methods used to pass various data between the client and server part of a web application. In the previous post I briefly described the cookies mechanism used to join the successive requests of the same user into a consistent session. The basic concept is that the server sends a cookie to the client and the client attaches it as a key to all subsequent requests sent to that server.

In fact, the same concept is often used without cookies or in addition to them. Why is this needed? One reason is that for security reasons some users can disable cookies support in their browsers. Another reason is that it is not always sufficient to identify only the user session.

For example, imagine that our application provides access to a database containing personal data of 1000 people. We want to find some “John Smith” and change, say, his status from “Married” to “Single”. Probably our web application has a search capability. When we apply it, it finds John Smith and shows his data to us using a web form. We make the change and click the “Update” button. As a result our browser creates a POST request that contains the values of all the form fields. When server receives that request, it updates the database.

However to do this it will not search the database for “John Smith” again. This is not the right way to work with a database, because there may be many people with the same name. The right way is to use some ID which is unique for each database record. When we initially made the search, the server found a record in the database and sent all its data (including that ID) to the client. We did not see the ID in the browser, because it did not contain any useful information for a human reader. However when we submitted the changed form, that value was passed to the server along with all the other form fields. When the server received the POST request, it did not need to search the database again, because it received the record ID along with all the other data, so it just updated the specified record.

Now let’s see how this is done in practice. Our web form HTML code could look like this:

<html>
<body>
 <form action="http://www.mysite.com/form_handler.php" method="post">
    Name: <input name="user" type="text" value="John Smith" /> <br>
    Status: <select name="status">
             <option value="s"> Single </option>
             <option selected value="m"> Married </option>
           </select> <br> <br>
   <input name="record_id" type="hidden" value="1234567890" />
   <input type="submit" value="Update" />
 </form>
</body>
</html>

When the above form is rendered in a browser, it is shown like this:

Rendered form

Note that the field named “record_id” is marked in the HTML code as hidden. Such fields are ignored when a visual representation is created. However they are submitted to the server along with all the other data. When we change the status to “Single” and click the “Update” button, the following request is sent to the server:

POST /form_handler.php HTTP/1.1
Content-Type: application/x-www-form-urlencoded

user=John+Smith&age=30&status=s&record_id=1234567890

Why all the above is important for load testing? The values of hidden parameters can be different for each user session, because they are provided by server. This means that when we create many sessions from the initially recorded template, we need to make sure that such values are extracted from server responses and passed as parameters of subsequent requests. Fortunately, most load testing tools, such as WAPT, can do this automatically. In the next post I will describe how it is done.

Posted in General | Tagged , , , , , , , | 1 Comment

Cookies and user sessions

We all know that a web site can have a complex distributed structure with load balancers and database servers. However from the outside view any web site is just a computer program that is always waiting from an HTTP connection. When something (usually a browser) connects to it and sends an HTTP request, it replies to that request and closes the connection. So, the “life” of that program consists of numerous elementary transactions sometimes occurring concurrently.

HTTP protocol by itself does not specify how the server should remember a user and how it should distinguish between different users. That is why the browser should include inside each HTTP request some unique key to tell the server that the request belongs to an existing user session.

One of the most common ways to create and use such session keys is provided by cookies. A cookie is a text string that is initially received by the browser from a web site. It is inserted in the special “Set-cookie” header of the HTTP response.

After a cookie is set, the browser will add it to all subsequent requests to the same web site. It will do so until one of the following things takes place:

  1. the user session is over (for session cookies);
  2. server sets a new cookie value to replace the previous one;
  3. the cookie is expired (for persistent cookies that has expiration date).

Each cookie is identified by name, path and site name. So, same web site can set many cookies with different names and some of them will be used only for particular paths on the site.

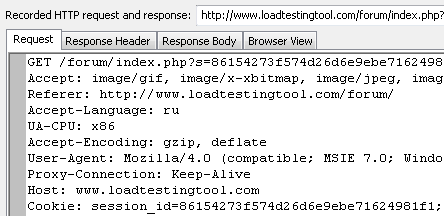
Let’s look how this works in practice. I will use a small session that I recorded when I wrote about the parameterization. I select the very first request of the profile in the left view in WAPT. This is what I see in the right view on the “Response processing” tab.

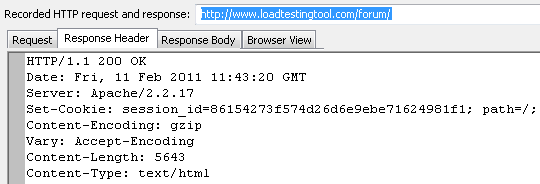
Cookie is set

As you can see, the server set cookie named “session_id” to the following long string: 86154273f574d26d6e9ebe71624981f1

Now when I select the next request, I can see its header (note the last line):

Sending cookie

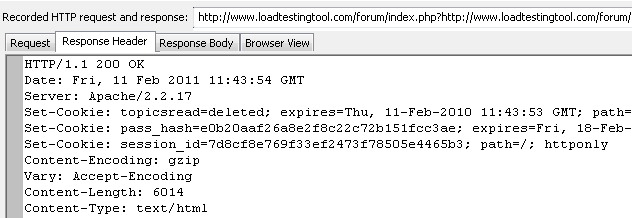
The browser returned to the server the cookie value that had been set. This way it told to the server that our second request corresponds to the session initiated by the first one. Same cookie you can find in the third request. However if we open the response to the fourth request, we can see that the site changed the session_id cookie in it:

New cookie value

Probably this was done because the third request was used to send the user name and password, so for security reasons it was reasonable to change that ID after completing the authentication.

When we run a test with WAPT, it performs all the required actions with cookies same way a browser would do this. So, when it replays our profile, it will receive a new cookie value in the response to the first request and add it to the headers of the subsequent requests. Note that it can be different from the value that we originally recorded.

Why all the above is important for load testing? First of all because we need to know that a load testing tool does not simply repeat the recorded sequence of requests. It needs to process the actual server responses and modify some dynamic values in requests for each session. With cookies this is done automatically, because this is a standard process performed identically for all web sites. However in some cases web site can pass session-specific data to the client and expect to receive it back inside the parameters of the subsequent requests. In such cases you have to specify manually how to calculate the values of those parameters depending on the previous responses. This is a very important, wide and interesting theme, but I will write about that later.

There is one more important thing about cookies. As I mentioned above, a cookie can have an expiration date. In this case it is called persistent. Such cookies remain on the client computer permanently until the expiration date has passed. This means that even if you visit the web site after closing the current user session (it can be the next day or month), your browser will send the cookie again and the web site will know that you visited it before. Usually this is used to save some important user settings on the web site. However when you record a profile for load testing, you usually want to create a session typical for a new user who has never visited the web site before. That is why it is recommended to delete all cookies before recording a test.

Posted in General | Tagged , , | 6 Comments

On parameterization

To create a load test we record a typical user session with help of a browser and a load testing tool. We want to use that session as a template to emulate hundreds or even thousands users working with our web site simultaneously. Our load testing tool will replay the recorded session for each user that it emulates.

However we also want each virtual user to use a different user name/password pair. That is why after recording a profile with our session we need to parameterize it. In other words, parameterization specifies how to make a real new session from the template that we originally recorded.

Let’s see how this can be done. As an example I will use WAPT and the following web site: http://www.loadtestingtool.com/forum.

I recorded a very simple session in which a user simply logs in to the web forum. It consists of 4 page requests:

Forum login session

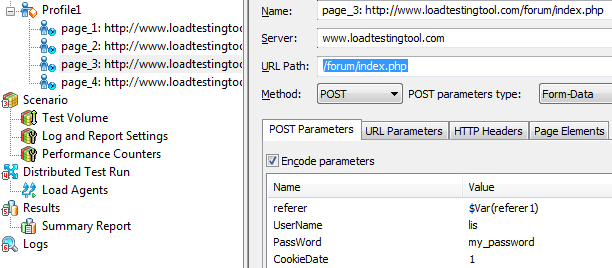
Even though last 3 requests use same URI, they have different sets of parameters. You can also notice that the third request uses POST method as specified in its properties, whereas other requests use GET. I select the POST request in the left view.

POST request with user name and password

Now we can see that the user name and password entered when recording the profile were passed as parameters of this request. They were recorded as static values. To parameterize our profile we need to modify the specification of these parameters.
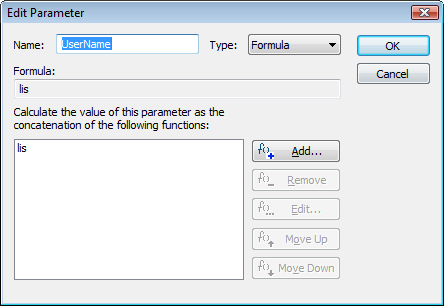
I select the “UserName” parameter in the list and click the “Edit” button. What I see now is the “Edit Parameter” dialog.

Edit parameter dialog

In WAPT each parameter is specified as a concatenation of several functions. This is the most general approach that allows us to create complex values. However usually we need to use only one function, so I select the only line in the list and click the “Edit” button again.

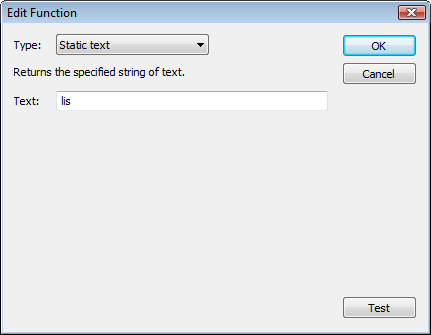
Edit function dialog

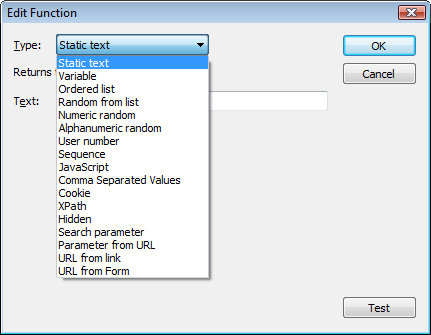
Now I need to choose a function that will return a different user name for each virtual user. Initially the “Static text” function is selected, however as it is obvious from its name, it returns same text for each user. So, we should change it. I click the combo to see the list of available options.

List of functions

We will discuss all these functions some time later. By the way, a formal description of each one is available here.

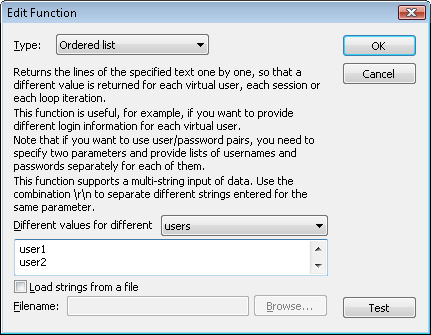
I want to choose a function that will take a list of user names and will return elements from it one by one for each new virtual user. This function is called “Ordered list”.

I enter the names in the edit field in that dialog, one per line. If I used a long list, I could also specify a file to read the names from.

Ordered list function

After finishing with the user name parameterization I repeat the same procedure with the password. As a result both parameters are specified now as follows.

That’s all! Now if we execute our test with 3 virtual users, each will repeat same session, but will use a different name/password pair. What if we add 4th user? Since we specified only 3 values for the “Ordered list” function, when it reads to the end of the list, it will have to start from the beginning and the 4th user will login as “user1/pass1” again. If this is not acceptable for your test, you should simply add more values.

Posted in Testing practice, WAPT usage | Tagged , , | 12 Comments

What is an HTTP request?

I will not write about HTTP protocol in general. I want to concentrate on few facts about HTTP requests that are important for load testing. As I mentioned in the previous post, when we work with a web site using a browser, all our actions produce HTTP requests that a sent to the server. Server replies to each of these requests. The browser uses these server responses to build each page that we see in its window. Some of the responses contain page text in form of HTML code, some contain images that we see on the page, and some carry additional data that is also used to display the page correctly.

Each HTTP request consists of 3 sections: request line, headers and body.

In WAPT you can take a look at any request in a raw form if you select it in the left view and choose the “Response processing” tab in the right view. In the lower part of the window you will see the request. It will look like this:

Raw Request

The request line begins either with “GET” or “POST” word. This is the method specification. There are other methods, but they are used for special purposes and do not usually appear in regular user sessions generated by browsers.

A GET-request is used to download a resource (page, image, etc.) from the server. POST-requests are used to pass some data to the server. They can contain form data, a file that should be uploaded, etc.

Method specification is followed by an URI (Uniform Resource Identifier). This is a string of text that we usually type in the address bar of a browser to get to a web page. Just the site name is stripped.

Both GET and POST requests can contain parameters. This is a very important part of request, because they are used to pass dynamic data. When two different users login to a web site, they do this by accessing same page and clicking the same button on it, but they provide different user names and passwords. As a result, same request is sent to the web site in each case, but it contains different values of parameters.

For GET-requests parameters are passed inside the URI after the “?” sign. This is an example:

GET /my_uri/page.asp?parameter_name1=value1&parameter_name2=value2

As you can see, each parameter has a name and a value, different ones are separated by “&”.

If POST method is used, parameters are passed inside the request body using the same notation.

Why is this important for load testing? To test a web site we need to emulate hundreds or even thousands simultaneously working users. We can record a single user session consisting of a sequence of requests. When running the test, we will use this sequence as a template for all our virtual users, but with small modifications: the values of some parameters will be different for each user. Of course, this is not always limited to just user names and passwords. In some cases the difference between the sessions of different users is much more complex.

In any case the above means that it is not sufficient to record a profile to run the test. After recording you need to specify how to calculate some parameters of requests for different virtual users. This is called parameterization.

Posted in General | Tagged , , , , , | Leave a comment

How a user session is recorded and replayed

As I wrote before, to load test a web site you need to record a sequence of actions that constitute a single user session on the site. Then when you run the test, this session it repeated by many virtual users running simultaneously.

Let’s look more closely on what does it mean to record a session. One would think that WAPT should record all the actions you perform at your computer using the mouse and keyboard. This approach would probably work, but it would be hard to replay such session in the test, because WAPT would need to emulate the full system environment for each virtual user. How many simultaneous users your system would be able to create in that case? If your browser normally consumes only 5% of the CPU time and RAM on your system, you would be able to overload it with just 20 users running 20 browsers. This is hardly a good performance for a load testing tool.

That is why WAPT does not run any browsers when performing the test. And that is why it does not record keyboard strokes and mouse movements. Instead of that it records the sequence of HTTP requests that your browser sends to your web site while you working with it.

In fact, all your actions in the browser window (when you fill forms, click links, buttons and use any other controls on web pages) are transformed into HTTP requests that are sent to the web site. These requests can transfer some data inside them. For example, when you login to a web application, you enter your user name and password in a form on the login page. When you click the “Login” button, the form is submitted to the web site. This is usually done by a POST request that contains all the form fields (user name and password in our case) as parameters.

When you record a profile, WAPT saves each and every request sent to the site along with all the data contained in the parameters. When you execute a test with the recorded profile, WAPT will send same sequence of requests to create a copy of the recorded session. What is most remarkable is that it can change the parameter values for each session it creates. So, different virtual users can use different names and passwords.

Posted in General | Tagged , | 14 Comments