Editing Scenario Options
To perform a test, you should create a test scenario.
WAPT Pro test scenario defines parameters of test run: the number of virtual users,
test duration, date and time when the test will be started, user simulation options and the list of
included user profiles.
Scenario also contains options for saving log files and test results.
To create a new test scenario, click the New button
 on the program toolbar.
New Scenario Wizard will be initiated.
This wizard will help you create a new test scenario depending on your test goals.
It also includes a short guide on test results.
on the program toolbar.
New Scenario Wizard will be initiated.
This wizard will help you create a new test scenario depending on your test goals.
It also includes a short guide on test results.
You can modify the properties of created test scenario. Select the necessary item in the Scenario folder of the tree view:
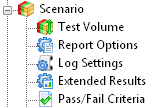
• Test Volume - the number of virtual users and test duration
• Report Options - general options for reports and graphs
• Log Settings - options for log files
• Extended Results - options for CSV data output
• Pass/Fail Criteria - here you can specify the criteria of successful test execution
Saving a Test Scenario
You can save a newly created test scenario and open it later to continue testing
your site. Scenario file includes information on all user profiles of the current scenario,
test volume options, user simulation options and settings for saving log files and test results.
Click the Save button
 on the program toolbar.
You will see the Save As dialog.
Type the appropriate name for a new scenario, select a location and click Save.
The file will be saved as a file with .wps extension.
It is WAPT Pro extension for files with test
scenarios. Scenario files store data in XML format.
on the program toolbar.
You will see the Save As dialog.
Type the appropriate name for a new scenario, select a location and click Save.
The file will be saved as a file with .wps extension.
It is WAPT Pro extension for files with test
scenarios. Scenario files store data in XML format.
If you wish to save changes made in the existing scenario, click the Save button
and all changes will be automatically saved.
After saving, the Save button becomes disabled.
WAPT Pro displays the name of test scenario in the title bar.
Opening a Test Scenario
You can open an existing test scenario and continue testing your site.
For this, click the Open button
 on the toolbar and
select a desired scenario file.
on the toolbar and
select a desired scenario file.
![]()